I just finished this a few days ago. its my New Twin Stick Controller for Virtual-On.
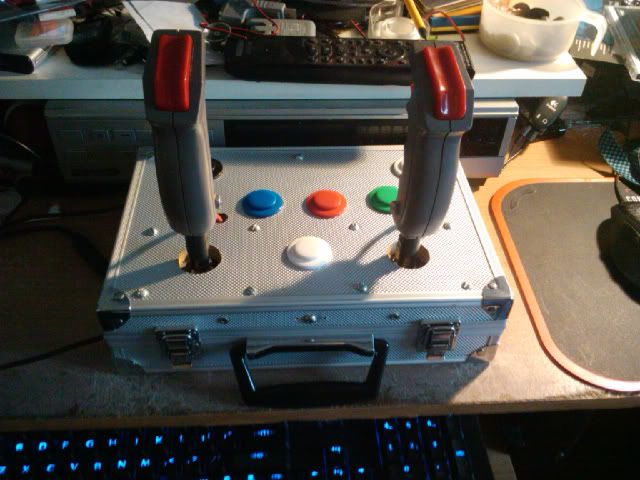
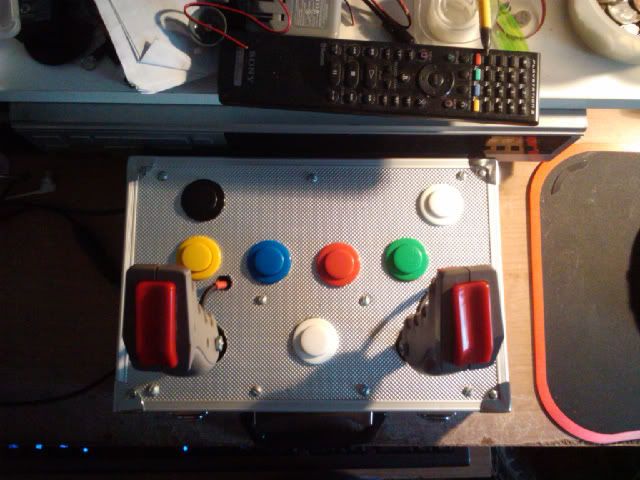
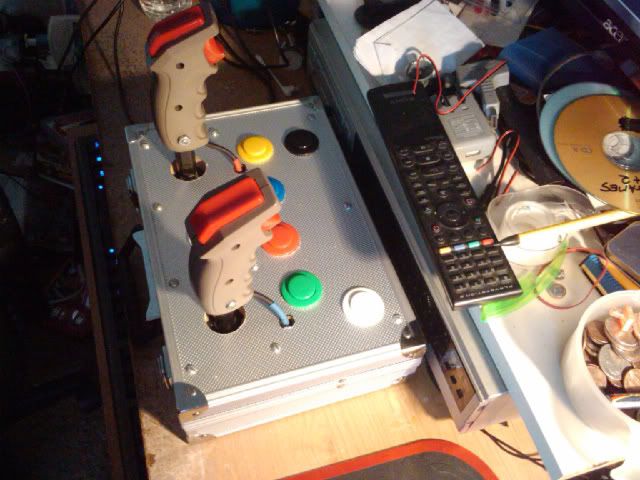
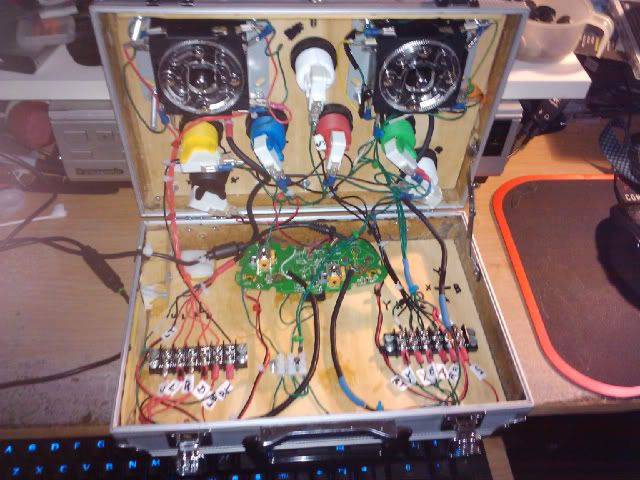
It Started off as a Game Stop (Mad Catz) Xbox 360 Controller which I striped down the the PCB.
Part List.
1 Game Stop (Mad Catz) Xbox 360 Controller (gutted for PCB and USB Cable)
2 NES Quick Shot Flight Stick Controllers (for the Trigger Grips)
2 Sanwa JLW-TM-8 Joysticks
2 Happ Competition Pushbutton, White
1 Happ Competition Pushbutton, Black
1 Happ Competition Pushbutton, Yellow
1 Happ Competition Pushbutton, Red
1 Happ Competition Pushbutton, Green
1 Happ Competition Pushbutton, Blue
1 Interact PSP "aluminum" Carrying Case (Really its mostly wood)
1 Scrap Plywood board (for reinforcing the carrying case).
2 Barrier Strips, American style
1 Barrier Strip, European style
Assorted machine and wood screws
Assorted electrical connectors
Assorted wire
Assorted electrical shrink wrap
15 Min J-B Weld 2 part Epoxy (used on the Sticks/ Grips)
Clear resin epoxy (2-part) (reinforcing electrical connectors on the Xbox controller PCB)
Strips of self adhesive material similar to Velcro (Holding down the controller PCB)
Another Xbox 360 Twin stick Mod, Now in TECHNICOLOR
- MentholMoose
- Virtual-On Positive
- Posts: 2047
- Joined: 15 Dec 2008, 22:06
- Gamertag: MentholMoose
- PSN: MentholMoose_
- Location: California
- Contact:
Re: Another Xbox 360 Twin stick Mod, Now in TECHNICOLOR
Very nice, thank you for sharing your project!
MentholMoose
Re: Another Xbox 360 Twin stick Mod, Now in TECHNICOLOR
Thanks MentholMoose, Honestly I have to give credit to many of the people here on this forum (who I borrowed ideas from), on http://www.instructables.com and this guy here, who started a Shortage in Japan of Choco Baco candy.
I am also looking into replacing the Quadrant lights from the controller PCB (the one near the Guide Button), to the controller surface, and maybe relocate the headset audio jack.
I am also trying to encourage some of my friends to go back to VOOT for some live 2 player gaming.
I am also looking into replacing the Quadrant lights from the controller PCB (the one near the Guide Button), to the controller surface, and maybe relocate the headset audio jack.
I am also trying to encourage some of my friends to go back to VOOT for some live 2 player gaming.
Follow Up
I was thinking of the Best way to extend the audio headset port on the PCB, then I came across this a 2.5mm Stereo Audio Extension Cable MALE-FEMALE I found on eBay. Unfortunately 6 feet is the shortest length I could find.
I am also delaying repositioning/replacement of the 4 LED lights to a day I have more time off.
- MentholMoose
- Virtual-On Positive
- Posts: 2047
- Joined: 15 Dec 2008, 22:06
- Gamertag: MentholMoose
- PSN: MentholMoose_
- Location: California
- Contact:
Audio jack Placement with out soldering
Okay my Audio jack repositioning worked.
This was to reposition the audio jack in a custom Xbox 360 controller (my custom twin sticks) with out soldering. This will also work on any other custom Xbox 360 controller mod.
There are no pictures for the time being, I hope my description is enough for people to follow, especially since actual setup and measurements will vary with your own projects.
I first tried the cord on a MS Xbox 360 wireless controller and a wired afterglow controller first, Success.
Tried the same procedure with the Mad Catz PCB in my custom controller, Works just like the other 2 controllers.
Next step is to install the audio cable in my custom controller.
The male end of the audio extension cable fits into the headset jack of the Mad Catz Xbox Controller PCB.
Now for the female Jack that fits on the outside of the controller. I was thinking of drilling a hole to feed this end of the cable though.
For the measurements, since I did not have dial calipers I guessed. I first a tried a 3/8" drill bit for the hole, it was too small.
Then I tried a 27/64" (next size up) still too tight. So i widen up the hole using a rat tail file. The Female end fit so snugly, I didn't bother using epoxy to cement the female audio jack in place.
The Audio jack fits standard 2.5 mm plugs, used by newer Xbox 360 headsets and many of 3rd party headsets as well as headsets that are meant for telephones.
Unfortunate the propitiatory connector that MS has for the jack, which alot of the cheaper Xbox 360 headsets use will not fit with out modification.
Not an issue for my since my old MS headset broke and my current plantronics brand headset fits fine since it uses a standard 2.5 mm jack.
Also for those who want to use standard PC wired headsets (the 3.5 mm audio jack type not USB) can use their choice of headsets with a xbox 360 controller with a Convert Dual 3.5mm to 2.5mm adapter like the ones found here.
- MentholMoose
- Virtual-On Positive
- Posts: 2047
- Joined: 15 Dec 2008, 22:06
- Gamertag: MentholMoose
- PSN: MentholMoose_
- Location: California
- Contact:
Re: Another Xbox 360 Twin stick Mod, Now in TECHNICOLOR
Thank you.MentholMoose wrote:Thanks for the great writeup!
I wanted to come up with a way for people to repositioned their audio jacks with out de-soldering the existing audio jack.
Also a update, I got the LEDs repositioned from the guide button area on the controller. When I remember which URL it is, I will post the write up i used to help me reposition and replace the LED Lights. I most likely will edit this post when I find the URLs.
- MentholMoose
- Virtual-On Positive
- Posts: 2047
- Joined: 15 Dec 2008, 22:06
- Gamertag: MentholMoose
- PSN: MentholMoose_
- Location: California
- Contact:
Re: Another Xbox 360 Twin stick Mod, Now in TECHNICOLOR
I will definitely do this for my modded Dreamcast Twin Sticks. I have successfully done one mod by desoldering the existing jack, but it was a nightmare. I'm glad there is a feasible alternative.darksakul wrote:Thank you.MentholMoose wrote:Thanks for the great writeup!
I wanted to come up with a way for people to repositioned their audio jacks with out de-soldering the existing audio jack.
MentholMoose
Re: Another Xbox 360 Twin stick Mod, Now in TECHNICOLOR
One thin I did realize, having the audio extension in the jack, the Xbox 360 PCB thinks that there is a headset plugged in all the time.